
How to Read Guitar Chord Diagrams (And Why It’s Easier Than You Think)
If you’ve ever looked up a guitar chord and been met with a grid of dots and numbers, you know the slight confusion that follows. What are the lines? What do the dots mean? Which finger goes where?
The good news is that chord diagrams are one of the most intuitive systems in music once someone explains them to you. After reading this guide, you’ll be able to look up any chord and know exactly what to do with your hands.
This is a foundational skill for any guitarist. At Manhattan Music, it’s one of the first things our teachers walk new students through, because once you can read a chord diagram, the whole world of guitar opens up. If you’d like that kind of structured guidance from the start, take a look at what’s included in our guitar lesson program.
What Is a Chord Diagram?
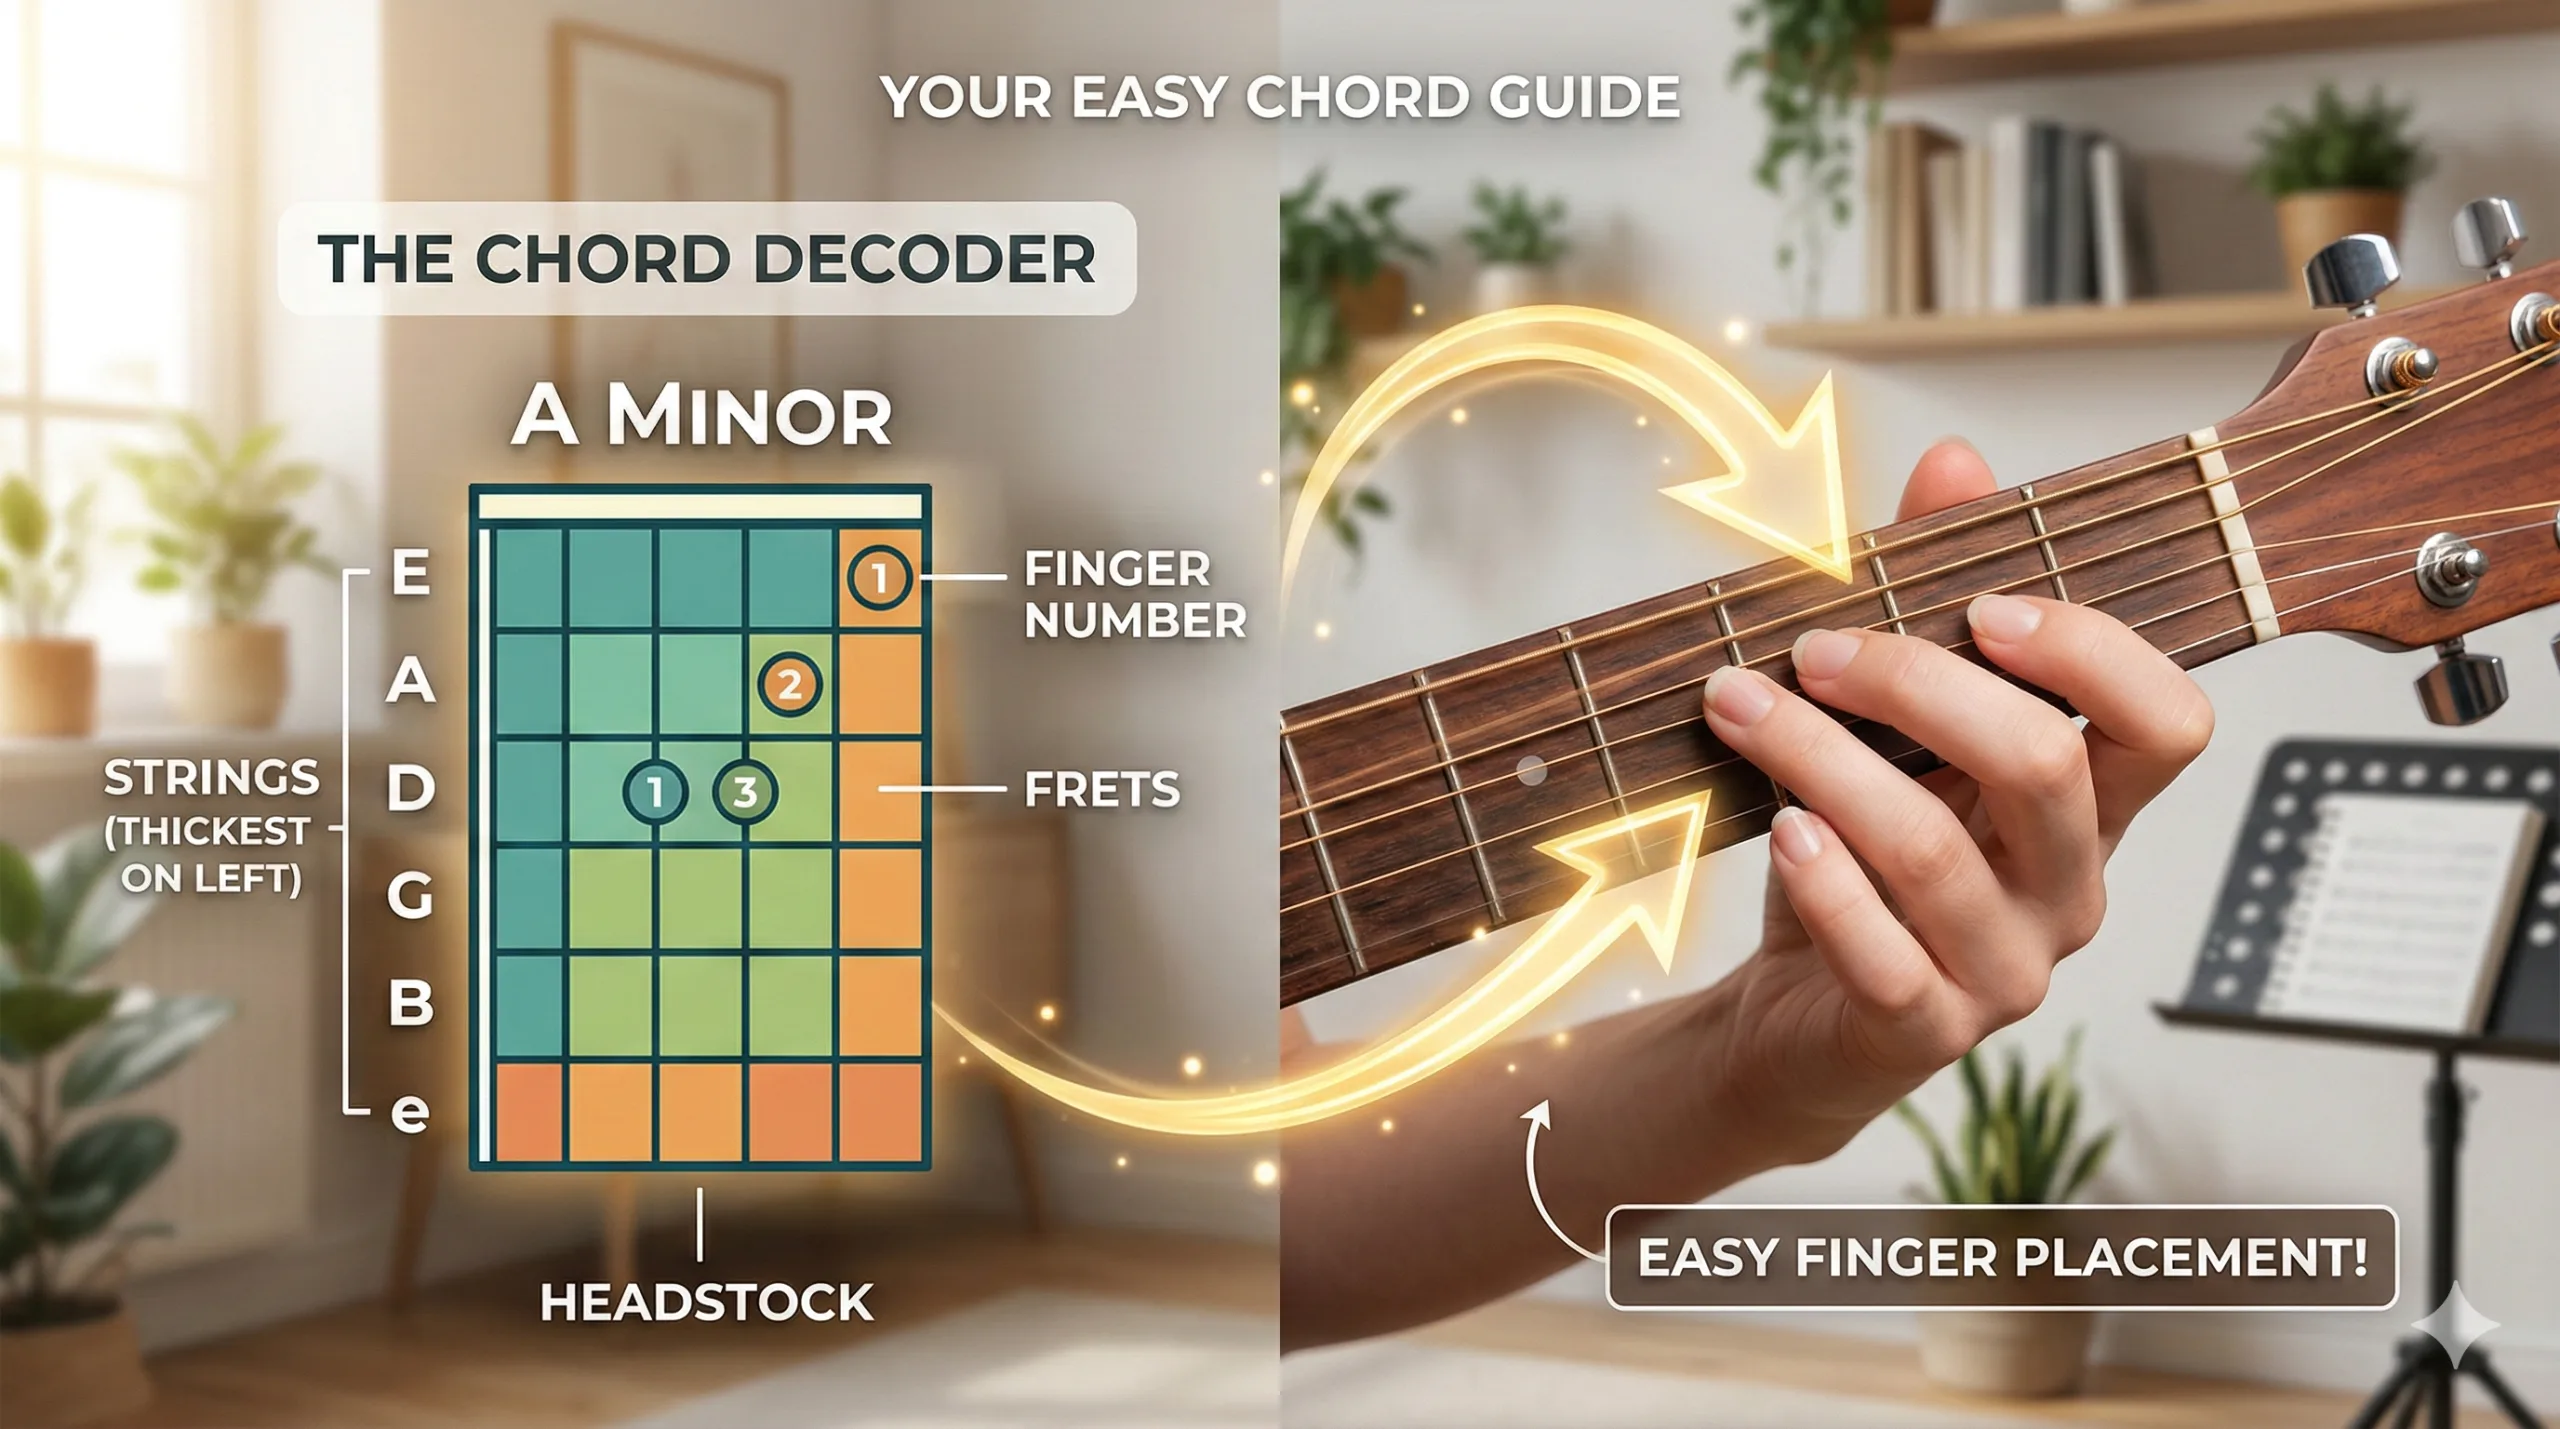
A chord diagram (sometimes called a chord chart or chord box) is a visual representation of part of the guitar’s fretboard. It shows you exactly where to place your fingers to form a chord.
Think of it as a map. The diagram shows a small section of the neck of the guitar, and the dots on that map tell you where to press down. Once you know how to read the map, navigating any chord becomes straightforward.
Before we go further, if you’re still figuring out which guitar to start with – acoustic or electric – that article is worth reading first, since chord diagrams apply to both.
The Basic Layout
The Vertical Lines — Strings
A chord diagram shows six vertical lines. These represent the six strings of your guitar. The leftmost line is the thickest string (the low E string, which produces the lowest note), and the rightmost line is the thinnest string (the high E string, which produces the highest note).
If you imagine holding your guitar up in front of you like a mirror — neck pointing upward — the diagram matches what you’d see.
The Horizontal Lines — Frets
The horizontal lines represent the frets — the metal strips along the neck of the guitar that divide it into segments. The top horizontal line in most diagrams is either the nut (the small piece at the top of the neck where the strings rest) or an indicator of which fret you’re starting from.
Most beginner chord diagrams show the first few frets, since open chords (chords that include unfretted strings) are played near the top of the neck.
The Dots — Finger Placement
The filled circles or dots on the diagram tell you where to press your fingers. Each dot sits on the intersection of a string and a fret, indicating that you should press that string down just behind (below) that fret with one of your fingers.
Numbers at the Bottom
Many diagrams include small numbers below the vertical lines (strings) or inside the dots themselves. These indicate which finger to use. The standard convention is: 1 = index finger, 2 = middle finger, 3 = ring finger, 4 = little finger (pinky).
Open Strings and Muted Strings
Above the diagram, you’ll often see small symbols above each string. A circle (O) above a string means play it open — don’t press it down, just let it ring. An X above a string means don’t play that string at all, either by not picking it or by lightly muting it with a nearby finger.
Reading Your First Chord — Let’s Try G Major
The G major chord is one of the first chords most guitarists learn, so it’s a good one to practise reading.
A typical beginner-friendly G chord diagram shows: a dot on the sixth string (low E), third fret, fingered with your middle or ring finger. A dot on the fifth string (A), second fret, fingered with your index finger. A dot on the first string (high E), third fret, fingered with your little finger. All other strings have an open circle above them — meaning they ring freely.
So your job is to place those three fingers on those three specific points, make sure the open strings can ring clearly without being accidentally muted, and strum all six strings together. That’s a G chord.
Once you’ve tried a few, use our interactive chord chart to look up any chord you want to learn — it’s a handy resource for practising at home.
What About Barre Chords?
Barre chords (sometimes spelled “bar chords”) introduce one extra symbol you’ll see in diagrams: a curved line or a bracket that spans multiple strings on the same fret. This indicates a barre — where you use your index finger to press down all the strings at once across a single fret.
Barre chords are more challenging than open chords and typically come later in your learning journey. But knowing how to read them in a diagram is half the battle.
How to Practise What You’ve Just Learned
The fastest way to get comfortable with chord diagrams is to look one up, try to form the shape, and play it. Then look up another one. Repetition turns a system that initially feels abstract into something completely natural.
A few approaches that help: work through the chords of a song you want to learn, referring back to diagrams each time you need to. Start with songs that use just two or three chords — our list of easy beginner songs to practise with is a good starting point. And keep a chord diagram reference handy — being able to quickly glance at a shape without breaking your flow makes practise sessions much smoother.
Practise with our interactive chord chart to explore common chord shapes, find fingering options, and bookmark the chords you’re working on.
Ready to Put This Into Practice?
Understanding chord diagrams is a skill you’ll use every single time you learn a new song. It’s one of those foundational things that seems small but makes a huge difference to how independently you can learn.
If you’d like a teacher to guide you through the early stages — building proper finger placement, getting clean chord sounds, and progressing at the right pace — Manhattan Music School in Eltham North is here to help. We teach students of all ages and levels, from first-timers to players returning after years away.
Call us on (03) 9439 4800 or visit our website to learn more and get in touch. You can find all the details about lessons, teachers, and availability through our guitar lesson program.